WiPy getting started

Recently I created a cat food dispenser using the Python programmable board, the WiPy. While working on that I noticed that the device requires quite some initial setup to get started. We will go through all the necessary steps to get you developing quickly and effectively.
What is this “WiPy”?
The WiPy started as a Kickstarter project a while back. It is unique in that it has WiFi and runs Python without the overhead of a full operating system. And with a lineup of devices supporting LoRaWAN, cellular and a combination of those. It has some real potential in being the brain for many of your hobby IoT and production projects.
There are a few drawbacks you can expect from a new device. It uses insecure connections (Telnet and FTP). It supports only a single FTP connection. And the documentation is scattered. I hope this post will help you get past the documentation issue and help you to get started using the WiPy.
The WiPy development ABCs
When getting started with the WiPy there are a few key things you should know/do:
- Get to know the board
- Connect the WiPy to local WiFi
- Setting up file editing and uploading
- Learning how to do basic operations such as rebooting and reading stdout.
You can use the Pymakr IDE to simplify parts of this initial setup. But, I like a bit more control. So we’ll look at setting up a development environment with a text editor and basic command line tools.
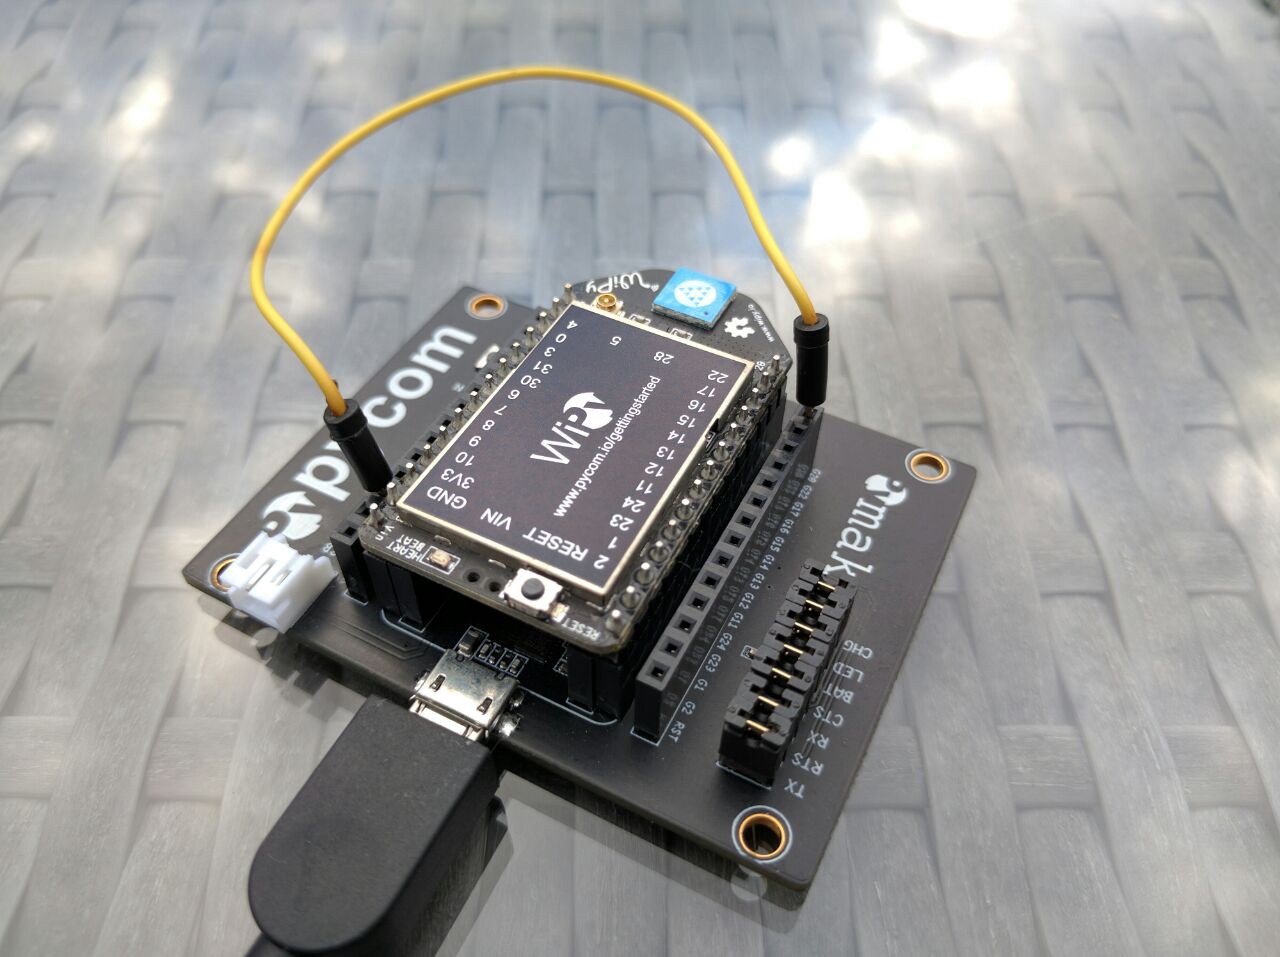
The WiPy board
The WiPy board has 24 GPIO pins, a heartbeat LED, a reset button and some internal timers. The memory contains a directory, “/flash” that contains the files “boot.py” and “main.py”. They execute in order on boot. Later we will edit “boot.py” to configure WiFi. And we’ll make the heartbeat LED blink by changing “main.py”.
To change the files we’ll connect to the FTP server on the device. And we’ll connect to the telnet server to read the programs output and perform reboots. But first we’ll have to power the device.
I power the WiPy by supplying USB power to the expansion board. Or you can supply power directly to the board through VIN or 3V3. See WiPy documentation on powering by an external power source how to use direct power.
Connect to local WiFi
When powered, the WiPy sets up an a WiFi access point that you can join with your development machine. While this connects you to the WiPy, it also disconnects you from your local WiFi. That in turn will likely disconnect you from the internet. This means you’ll have to switch a lot during development. So really the first thing to do is configure the WiPy to join your local WiFi. That way you can develop and access your Facebook at the same time.
The WiPy provides an access point with the name “wipy-wlan-<something>” when powered. Join this network with the password “www.wipy.io”. Once connected you should be able to ping the device on this network at the address “192.168.1.1”.
We will change the ”boot.py” file on the WiPy to join our local WiFi network. First create a file ”boot.py” with the following contents:
# boot.py -- run on boot-up
# can run arbitrary Python, but best to keep it minimal
#
# WiPy WiFi setup, augmented code from:
# http://micropython.org/resources/docs/en/latest/wipy/wipy/tutorial/wlan.html#assigning-a-static-ip-address-when-booting

import machine
from network import WLAN

IP = '192.168.1.42'
SUBNET = '255.255.255.0'
GATEWAY = '192.168.1.1'
DNS_SERVER = '8.8.8.8'
SSID = 'myOwnWifiName'
WIFI_PASS = 'correcthorsebatterystaple'

wlan = WLAN()

if machine.reset_cause() != machine.SOFT_RESET:
    wlan.init(WLAN.STA)
    wlan.ifconfig(config=(IP, SUBNET, GATEWAY, DNS_SERVER))

if not wlan.isconnected():
    wlan.connect(SSID, auth=(WLAN.WPA2, WIFI_PASS), timeout=5000)

    while not wlan.isconnected():
        machine.idle()  # save power while waiting
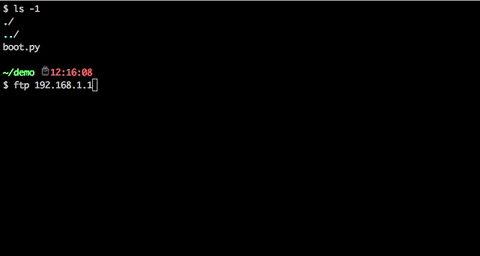
Next upload this new file to the WiPy using FTP. Open the connection using either ftp 192.168.1.1 or open 192.168.1.1 (depending on your OS). Login with user “micro” and password “python”. Then issue the following commands:
cd flash
send boot.py
Finally close the connection using CTRL-D.
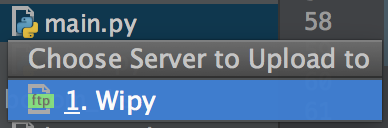
FTP upload of new “boot.py” file to WiPy.
That should do it. Reset the WiPy (cycle power or hit the tiny reset button) and the WiPy should join your local network. See if it works by pinging: ping 192.168.1.48.
Uploading an incorrect “boot.py” is a good way to lock yourself out. If that happens, fear not, you can recover using “safe boot”.
Safe boot
If you lock yourself out of your WiPy, you can perform a “safe boot”. This will start the WiPy without executing the “boot.py” script meaning you’ll be able to connect to WiPy access point.
Briefly connecting the 3v3 pin to pin 28 while hitting the reset button will perform a safe boot.
This will skip the user defined “boot.py” and “main.py” scripts. In turn this restores the default WiFi access point. The changes don’t persist. If you reboot the WiPy without pulling up pin 28 it will start using the “boot.py” and “main.py” files
From a safe boot you can upload the revised and now hopefully corrected “boot.py”. See if the revised file lets your WiPy join your WiFi after reboot.
FTP upload
To edit the Python files locally and easily execute them on the remote requires some work. You can use the same technique to send files as we did when sending the revised “boot.py”. But I prefer a bit more automated approach.
I use IntelliJ for development, so we’ll look at how you can setup a remote host for easy file upload. We will also look at the command line tool “lftp” to script the upload process.
IntelliJ remote host
After configuring a remote host in IntelliJ it is easy to upload or even sync a local folder to the WiPy. Start by opening “Tools > Deployment > Configuration”. Configure it like so:
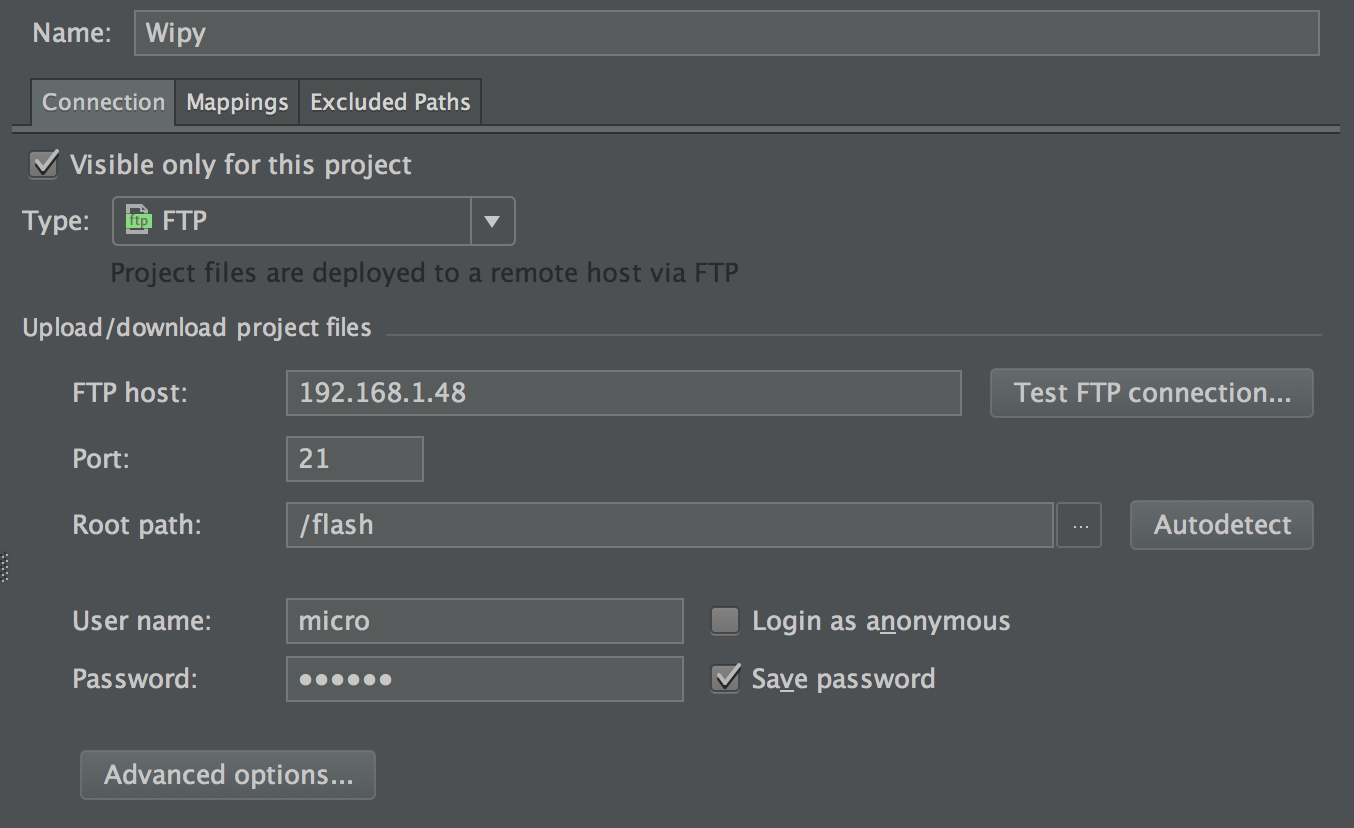
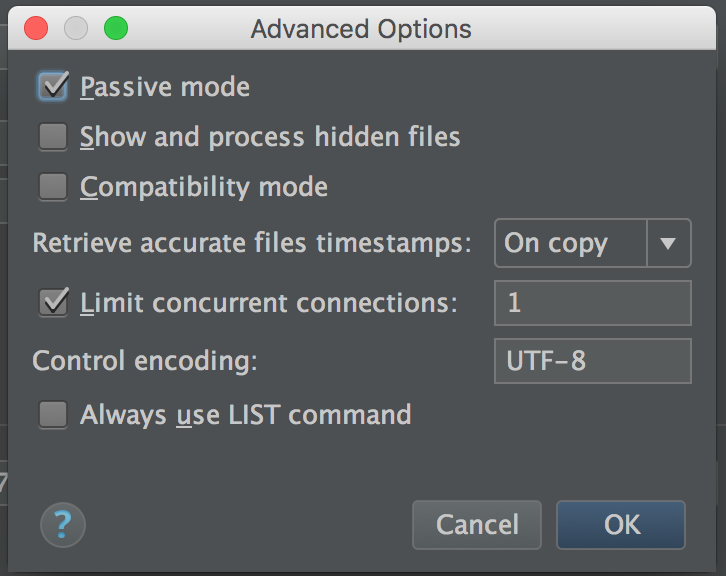
Use the advanced settings:
After the initial setup local folders can be mapped to remote folders to enable auto upload. But I like to manually upload changes.
Manual upload works by execute the command “Upload to… [Deployment]”. Or by using the shortcut: CMD-LSHIFT-ALT-X (keybindings may vary). Then pick the WiPy remote as the target and your file will be uploaded.
lftp upload
lftp is a command line tool that makes it easy to upload code through simple scripts. The following bash script sets up a connection and sends the “main.py” file to the WiPy:
#!/bin/bash

# Save as file upload.sh
# first argument is WiPy IP

lftp -u micro,python $1 << EOF

cd /flash
put main.py

bye
EOF
You can use it to upload your “main.py” file using:
sh ./upload.sh 192.168.1.48
Telnet
During development it is useful to have a Telnet session open to the WiPy. It shows you print statement output. And you can reset the WiPy without having to cycle the power or press the tiny reset button.
To get a Telnet session up, use the following command and login with user “micro” and password “python”:
telnet 192.168.1.42
To perform a soft reboot hit CTRL-D. It will restart the WiPy and execute the “main.py” script. Any print statement output will be directly visible in your shell.
I haven’t looked into debugging configurations that would allow breakpoints, call stack and variable inspection. Though it certainly would be useful. If anyone figures out how to setup this kind of debugging please give a ping back.
Actual coding
So after all these configuration steps we have an environment to quickly develop for the WiPy.
Hello world
To test your setup, try programming a simple hello world application using the on board heartbeat LED. Next to the FTP upload script from before create a new file “main.py”:
import time
import wipy

while True:
  wipy.heartbeat(False) # disable the heartbeat
  time.sleep_ms(100)
  wipy.heartbeat(True) # enable the heartbeat
  time.sleep_ms(100)
Upload the script with:
sh upload.sh 192.168.1.48
Now execute the “main.py” file by either cycling the power, hitting the reset button or hitting CTRL-D in a Telnet session. The result should be a fast blinking heartbeat LED.
Hello world pin
The heartbeat LED is connected to pin 25. So to get acquainted with the PIN API, here is the same program using PIN configuration:
import time
from machine import Pin

led = Pin('GP25', mode=Pin.OUT)

while True:
  led(0)  # turn off the heartbeat LED
  time.sleep_ms(100)
  led(1)  # turn on the heartbeat LED
  time.sleep_ms(100)
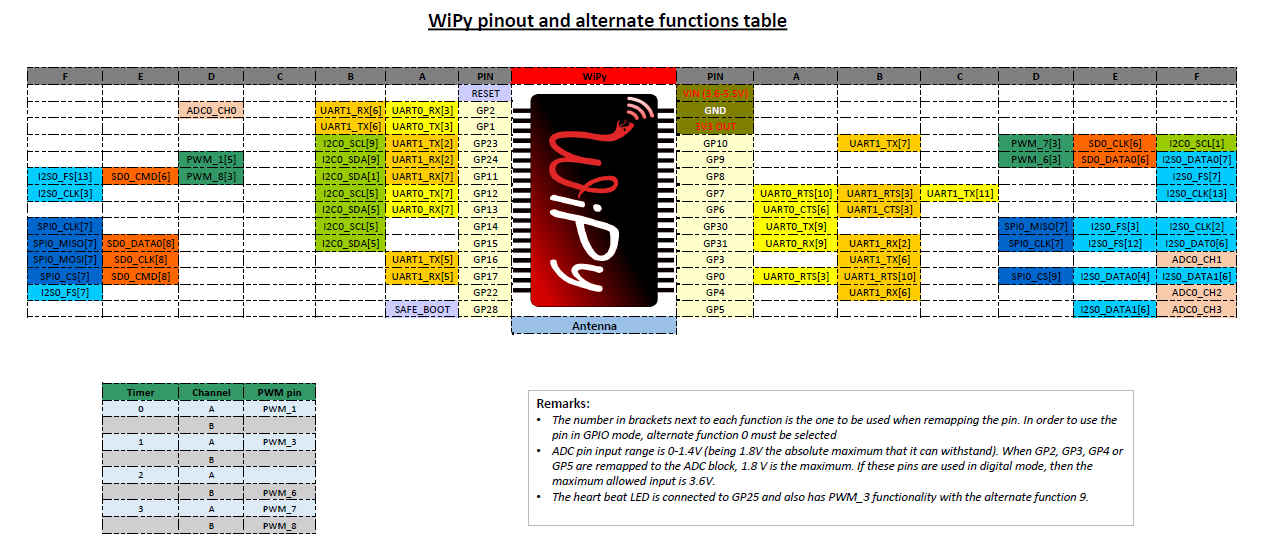
The program puts pin 25 in output mode and controls the output. Of course you can also use these GPIO pins to read an signal and use internal resistors to pull up or down the input. For these operations and more, see the documentation.
Where to go from here
This should have gotten you started with a basic setup for developing with a WiPy. I’ll leave you with a few links to specific documentation resources to help you on with your projects:
- Basic API calls
- Pin out image
- Available Python, MicroPython and WiPy libraries
- Control servos using the board timers: MicroPython for your cat
Related
This post is part of the project MicroPython for your cat (WiPy food dispenser)